6.7 Pico
이전 게시물에서 Python Flask 로 HTML 에서 For 문을 사용했었다.
현재 만든 Job Scrapper 웹사이트는 별로 예쁘지 않다.
Pico CSS 를 사용해서 꾸며본다.
HTML 에 Pico 를 추가하기만 해도 HTML 을 작성하면 웹 사이트가 보기 좋아진다.
( 적은 양의 CSS 로 보기 좋게 만들어준다. - 예쁘게 만들어준다. )
https://picocss.com/ 로 접속해서 Get started 를 눌러 시작한다.

좀 내리다 보면 Install from CDN 을 볼수 있다. 여기서 코드를 복사한 다음에 head 에 추가한다.

< home.html > - Pico Install from CDN 코드 복사해서 붙여넣기
<!DOCTYPE html>
<html lang="en">
<head>
    <meta charset="UTF-8">
    <meta http-equiv="X-UA-Compatible" content="IE=edge">
    <meta name="viewport" content="width=device-width, initial-scale=1.0">
    <title>Job Scrapper</title>
    <link rel="stylesheet" href="https://unpkg.com/@picocss/pico@latest/css/pico.min.css">
</head>
<body>
    <h1>Job Scrapper</h1>
    <h4>What job do you want?</h4>
    <form action="/search" method="get">
        <input type="text" name="keyword" placeholder="Write keyword please" />
        <button>Search</button>
    </form>
</body>
</html>home.html 을 저장하고 main.py 파일을 다시 실행하고
크롬창을 열어 127.0.0.1:5000 접속하면 아래와 같이 Pico CSS 가 적용된 웹 사이트로 변경된다.
( 기존에 열려있던 127.0.0.1:5000 새로고침 해도 된다. )
Pico 는 styles 를 보기 좋게 만들어주고 버튼도 예쁘게 만들어준다.

Pico 에는 여러 element 가 있는데, 예를 들어 container element 가 있다.
만약 아이템이 중앙에 위치하길 원한다면 main 을 만들고 클래스로 container 만 해주면 된다.

< home.html > -<main class="container"> 코드 추가.
<!DOCTYPE html>
<html lang="en">
<head>
    <meta charset="UTF-8">
    <meta http-equiv="X-UA-Compatible" content="IE=edge">
    <meta name="viewport" content="width=device-width, initial-scale=1.0">
    <title>Job Scrapper</title>
    <link rel="stylesheet" href="https://unpkg.com/@picocss/pico@latest/css/pico.min.css">
</head>
<body>
    <main class="container">
        <h1>Job Scrapper</h1>
        <h4>What job do you want?</h4>
        <form action="/search" method="get">
            <input type="text" name="keyword" placeholder="Write keyword please" />
            <button>Search</button>
        </form>
    </main>
</body>
</html>home.html 파일을 저장하고 main.py 파일을 다시 재실행 후 127.0.0.1:5000 을 재접속 or 새로고침하면
( 서버 종료 후 재실행 )
아래 화면처럼 가운데로 정렬된다.

이 외에도 grid, horizontal scroller(가로 스크롤) 등 여러 elements 가 있다.

내가 HTML 에 추가한 것은 단지 CSS 코드이며, 이건 모든 일반 HTML 태그에 적용되고 있다.
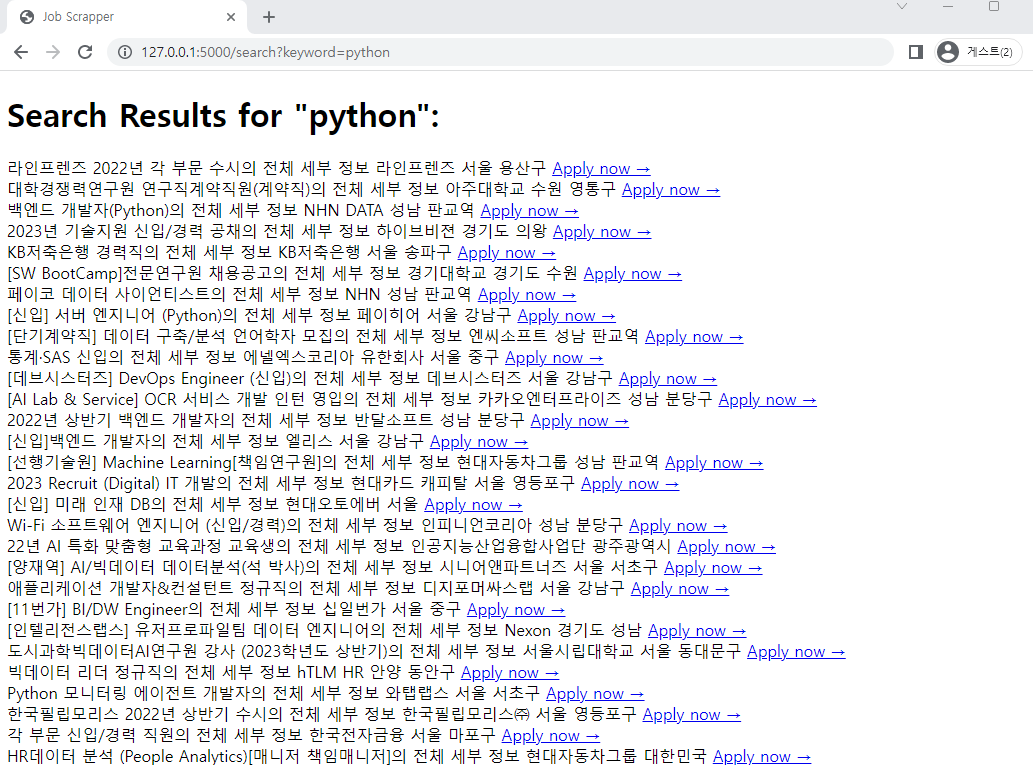
기존에는 python ( keyword ) 검색 시 흰 배경의 단순한 검색결과를 나타내는 화면이 출력되었다.
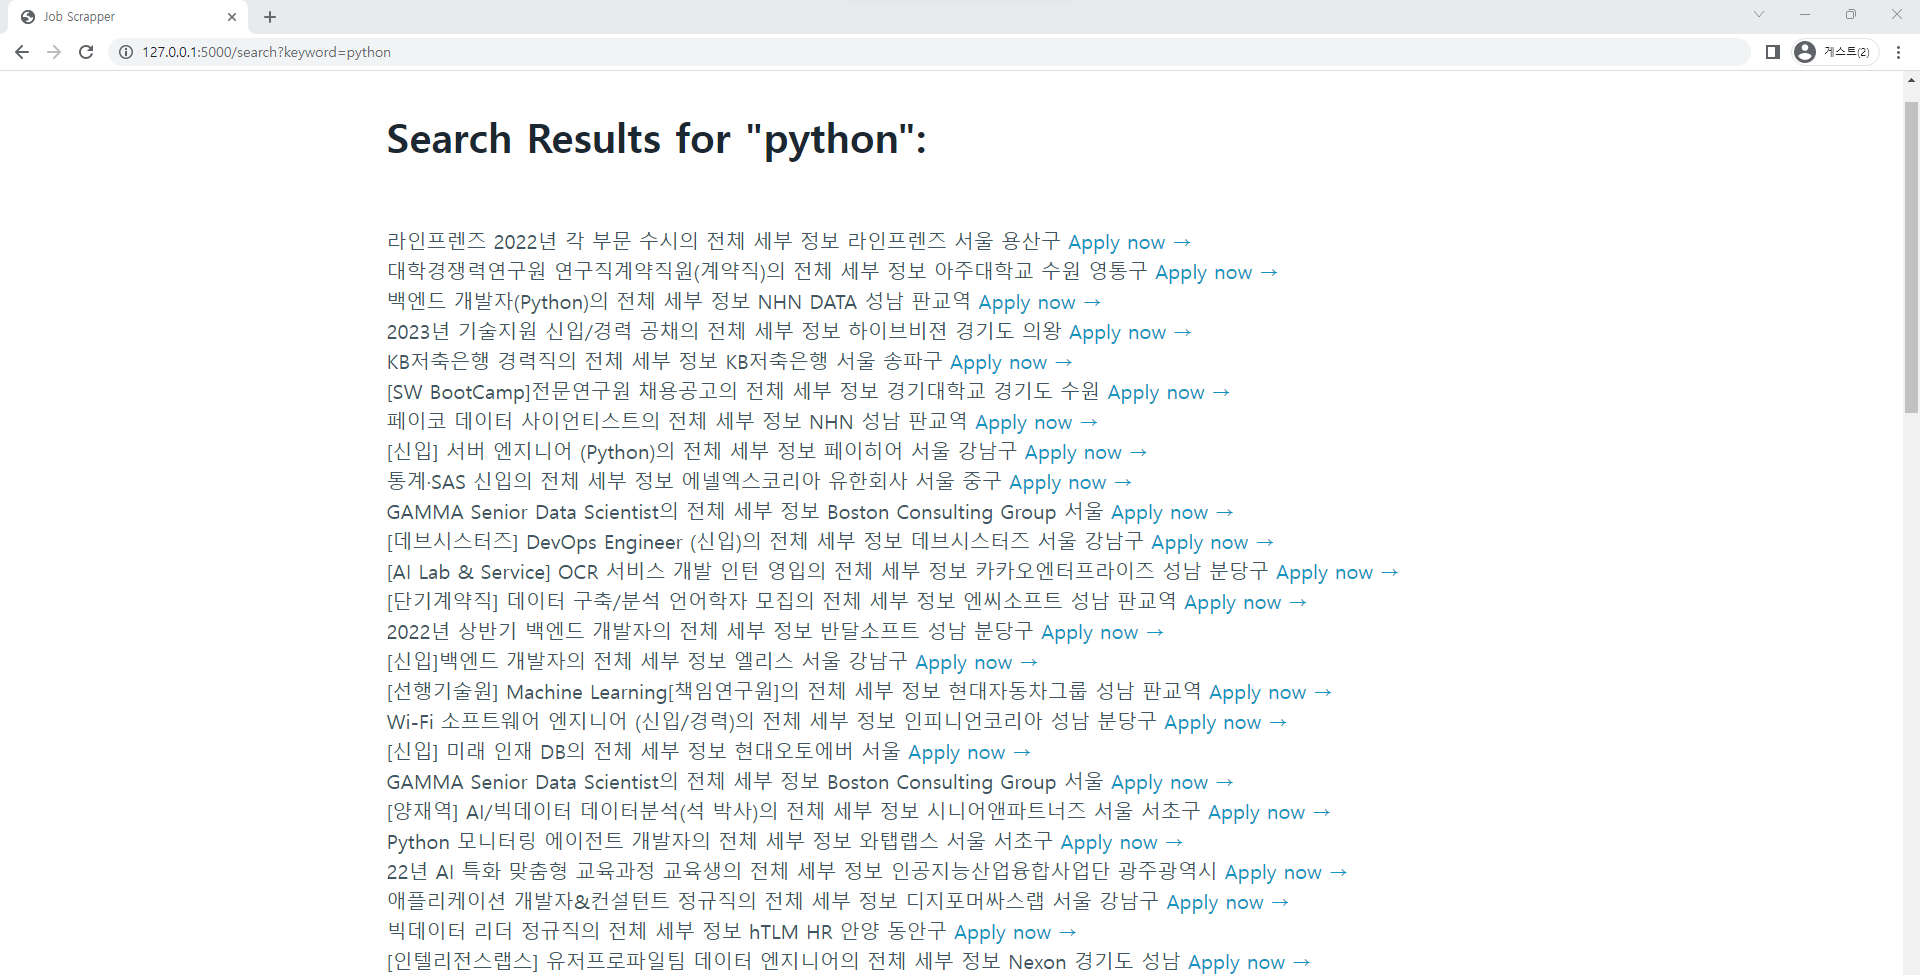
물론 search.html 에도 Pico CSS 를 적용하면 좀 더 나은 화면이 출력된다.
< search.html > - Pico CSS 링크 코드 추가, main class container 코드 추가
<!DOCTYPE html>
<html lang="en">
<head>
<meta charset="UTF-8">
<meta http-equiv="X-UA-Compatible" content="IE=edge">
<meta name="viewport" content="width=device-width, initial-scale=1.0">
<title>Job Scrapper</title>
<link rel="stylesheet" href="https://unpkg.com/@picocss/pico@latest/css/pico.min.css">
</head>
<body>
<main class="container">
<h1>Search Results for "{{keyword}}":</h1>
{% for job in jobs %}
<div>
<span>{{job.position}}</span>
<span>{{job.company}}</span>
<span>{{job.location}}</span>
<a href="{{job.link}}" target="_blank">Apply now →</a>
</div>
{% endfor %}
</main>
</body>
</html>기존 main.py 를 재실행 하고 127.0.0.1:5000 에 접속하여 python 검색 시 아래 화면처럼 정렬되어 출력된다.
좀 더 예쁜 화면을 출력하기 위해 Pico 에서 Tables 라는 elements 를 활용해본다.
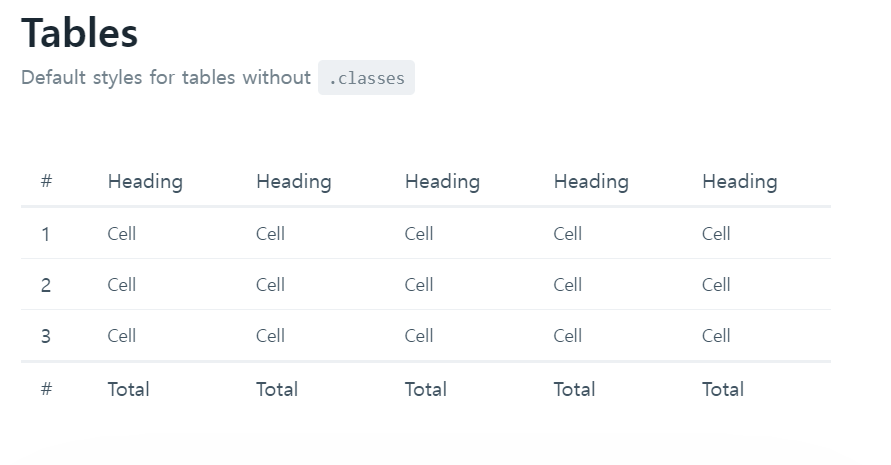
기존의 search.html 의 div span span span 코드를 제거하고 table 을 만든다.
< search.html >
<!DOCTYPE html>
<html lang="en">
<head>
<meta charset="UTF-8">
<meta http-equiv="X-UA-Compatible" content="IE=edge">
<meta name="viewport" content="width=device-width, initial-scale=1.0">
<title>Job Scrapper</title>
<link rel="stylesheet" href="https://unpkg.com/@picocss/pico@latest/css/pico.min.css">
</head>
<body>
<main class="container">
<h1>Search Results for "{{keyword}}":</h1>
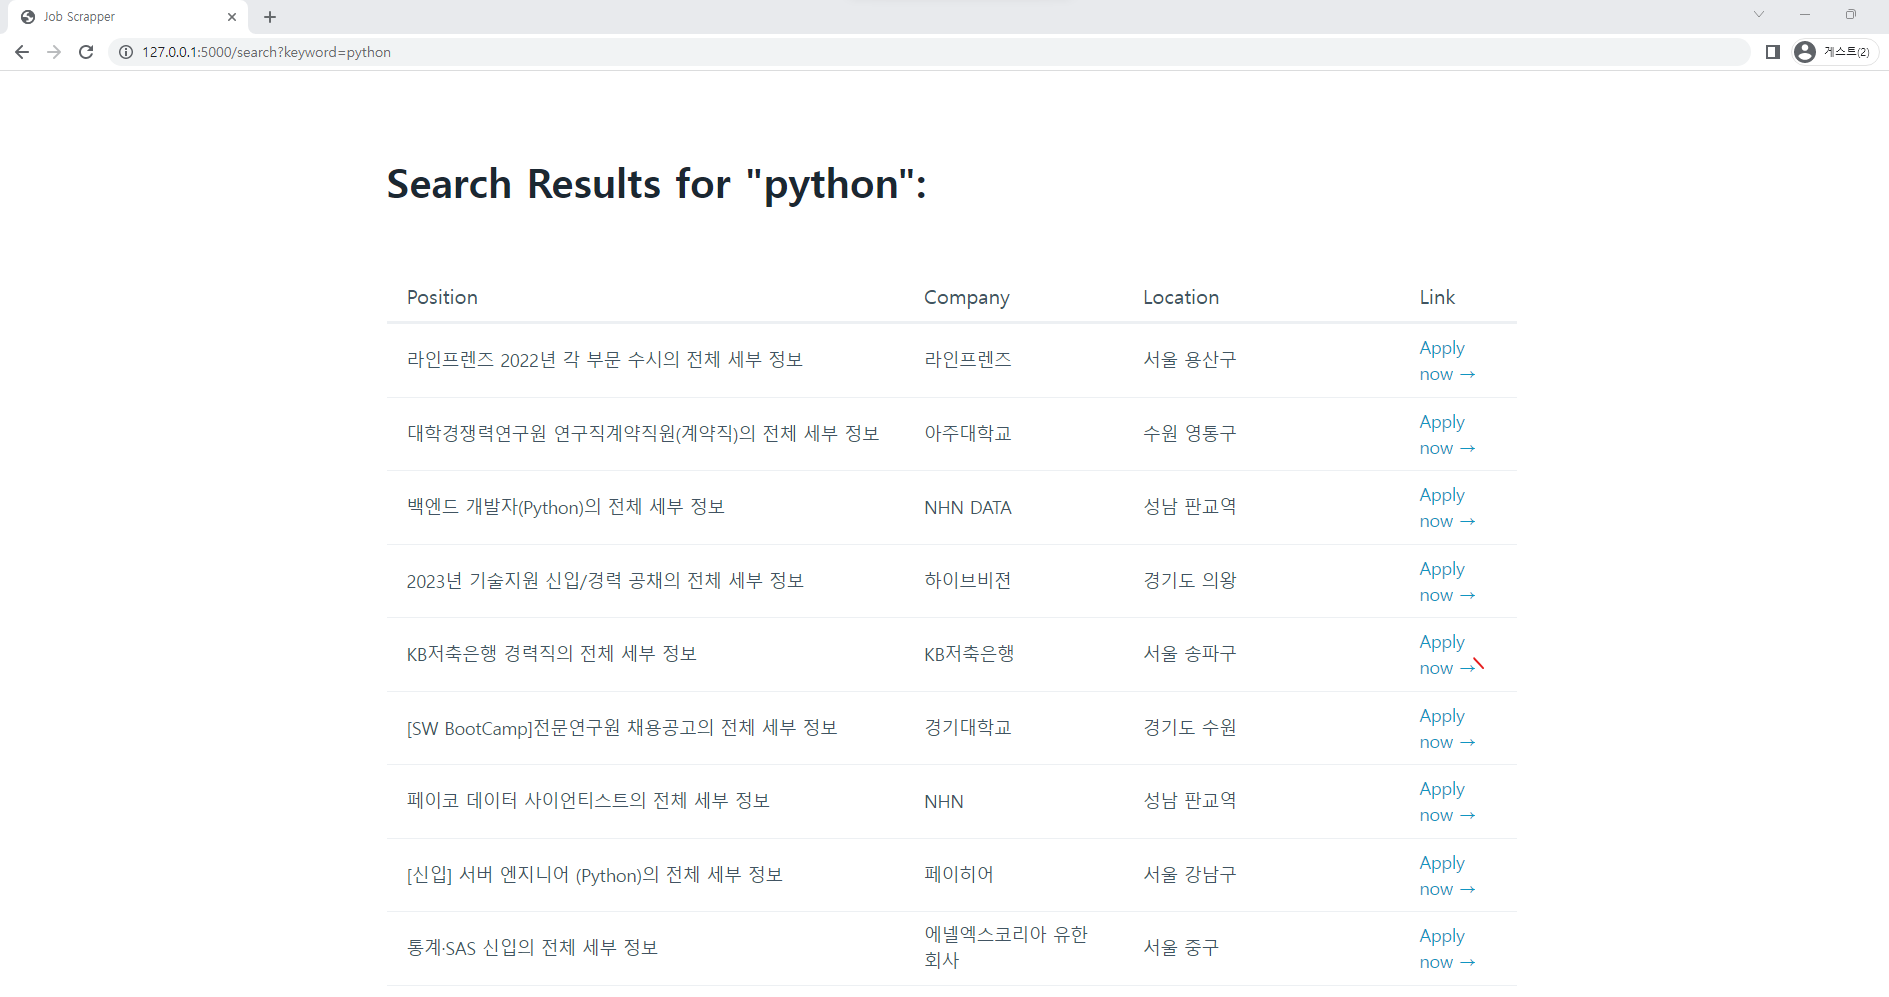
<table>
<thead>
<tr>
<th>Position</th>
<th>Company</th>
<th>Location</th>
<th>Link</th>
</tr>
</thead>
<tbody>
{% for job in jobs %}
<tr>
<td>{{job.position}}</td>
<td>{{job.company}}</td>
<td>{{job.location}}</td>
<td><a href="{{job.link}}" target="_blank">Apply now →</a></td>
</tr>
{% endfor %}
</tbody>
</table>
</main>
</body>
</html>search.html 저장 후 main.py 파일 재실행 후 127.0.0.1:5000 접속하여 python 검색
( 기존 http://127.0.0.1:5000/search?keyword=python 새로고침 해도 된다. )
좀 더 이쁜 웹 페이지를 만들기위해 table 에 grid 를 추가한다.
( table 에 가로 줄 추가 ) - <table role="grid"></table>
( table 을 가로로 스크롤 ) - <figure></figure> 안에 table 코드 넣으면 된다.
< search.html >
<!DOCTYPE html>
<html lang="en">
<head>
<meta charset="UTF-8">
<meta http-equiv="X-UA-Compatible" content="IE=edge">
<meta name="viewport" content="width=device-width, initial-scale=1.0">
<title>Job Scrapper</title>
<link rel="stylesheet" href="https://unpkg.com/@picocss/pico@latest/css/pico.min.css">
</head>
<body>
<main class="container">
<h1>Search Results for "{{keyword}}":</h1>
<figure><table role="grid">
<thead>
<tr>
<th>Position</th>
<th>Company</th>
<th>Location</th>
<th>Link</th>
</tr>
</thead>
<tbody>
{% for job in jobs %}
<tr>
<td>{{job.position}}</td>
<td>{{job.company}}</td>
<td>{{job.location}}</td>
<td><a href="{{job.link}}" target="_blank">Apply now →</a></td>
</tr>
{% endfor %}
</tbody>
</table></figure>
</main>
</body>
</html>search.html 파일 저장 후 main.py 파일 재실행 후 127.0.0.1:5000 접속 하여 python 검색.
( 기존 http://127.0.0.1:5000/search?keyword=python 새로고침 해도 된다. )

각 구인정보의의 색깔이 구분되는 웹 페이지가 나온다.
크롬 다크 모드로 바꾸면 아래처럼 나온다. ( 개인 취향 선택 )

.
python 참고 강의
'Programming > Python 웹 스크래퍼 만들기' 카테고리의 다른 글
| Python Flask 웹 사이트 다운로드 버튼 만들기 (1) | 2023.01.10 |
|---|---|
| Python Flask 가짜 DB 만들어서 웹사이트 속도 향상 시키기 (0) | 2023.01.09 |
| Python Flask 로 HTML 에서 For 문 사용 (0) | 2023.01.05 |
| Python Flask Arguments (0) | 2023.01.02 |
| Python Flask 간단 정리 (0) | 2022.12.30 |